Are you experiencing lag or stuttering while producing music in FL Studio? Clearing RAM (Random Access Memory) is crucial for your computer to function smoothly, and when your DAW consumes too much of it, your workflow can suffer from slowdowns, crashes, or glitches.In this guide, we’ll explore effective methods to clear RAM in FL Studio and optimize your workflow.
Discover GRAMMY GO courses exclusively on Coursera
Understanding RAM in FL Studio
RAM is the temporary storage that your computer uses to load and run applications. In FL Studio, RAM is used to store samples, plugins, and project data. Large sample libraries, effects-heavy projects, or multiple plugins running simultaneously can quickly consume a significant amount of memory, leading to performance issues.
Why Clear RAM in FL Studio?
FL Studio, like any digital audio workstation (DAW), can be resource-intensive. As you add more plugins, samples, and audio clips to your project, RAM usage increases. Clearing RAM can help:
- Reduce audio glitches and stuttering
- Improve overall performance
- Allow for smoother playback and editing
Methods to Clear RAM in FL Studio
1. Monitor RAM Usage in FL Studio
Before you can start optimizing your RAM, you need to know how much of it is being consumed. In FL Studio, you can easily track your memory usage by following these steps:
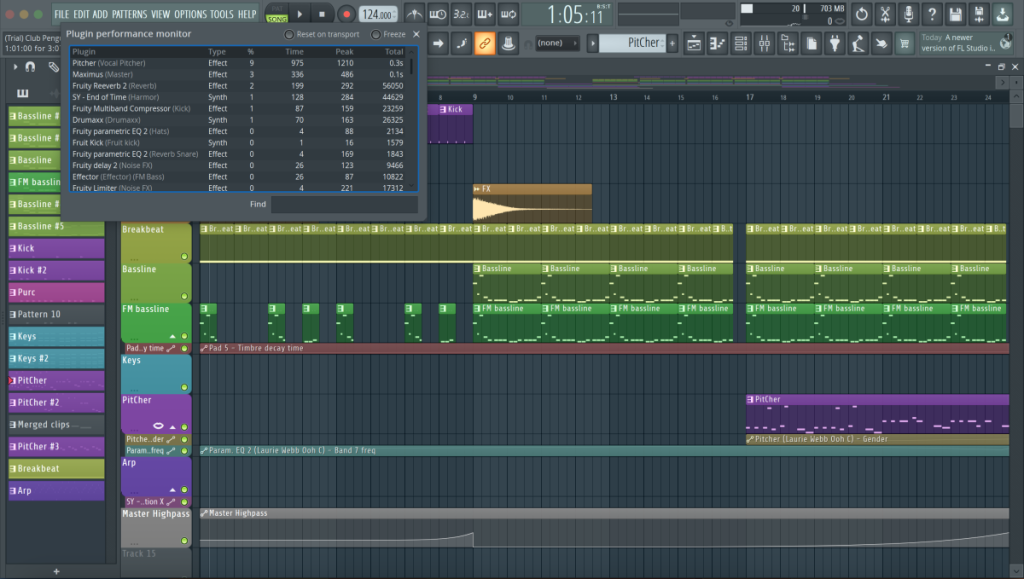
- Go to the Taskbar at the top of the screen and select View > Plugin Performance Monitor.
- This will show a detailed list of all the plugins in your session, how much CPU and RAM each one is consuming, and which ones might be causing issues.
By identifying memory-hogging plugins or instruments, you can begin to strategize ways to free up RAM in the next steps.
2. Close Unused Plugin Windows
One of the simplest ways to free up RAM is to close unused plugin windows:
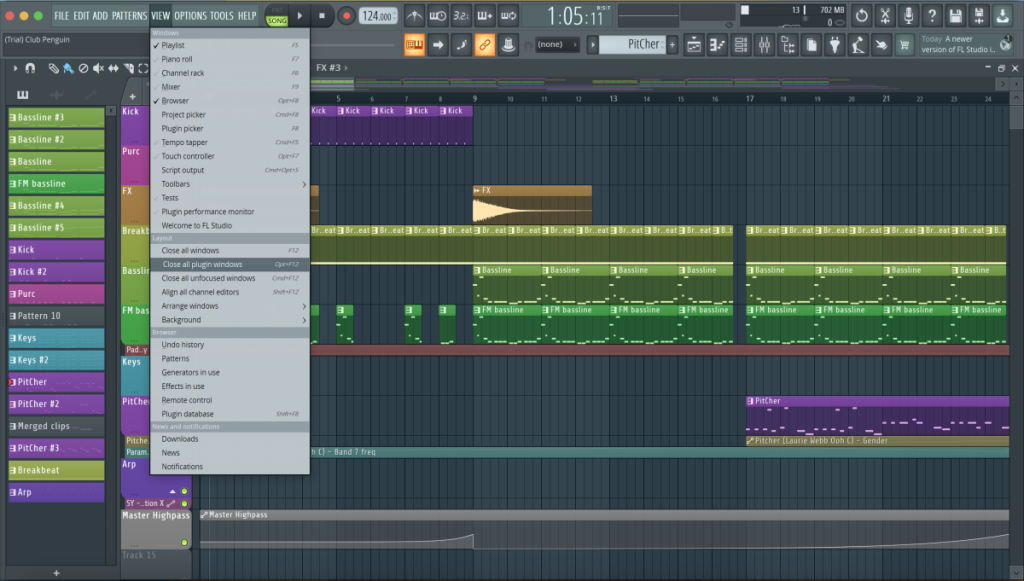
- Use the View Menu > Close all plugin windows (Alt/Opt+F12)
- Make it a habit to close plugin windows you’re not actively using
3. Enable Smart Disable
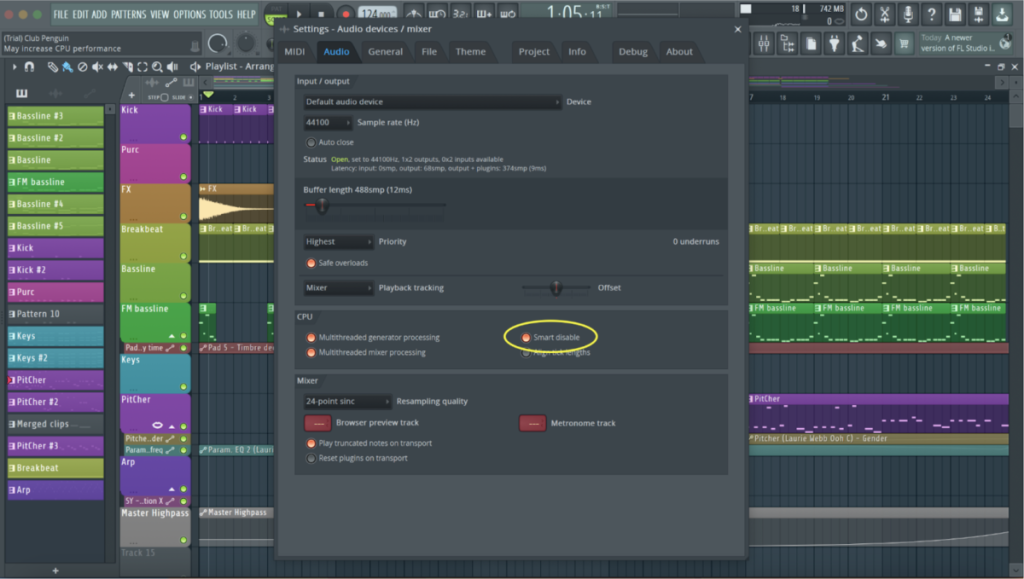
Smart Disable can significantly decrease CPU and RAM usage:
To enable Smart Disable for all plugins:
- Step 1: Go to Options > Audio Settings > Enable Smart Disable.
- This feature disables effects and instruments when they’re not making sound
4. Adjust FL Studio’s Buffer Length
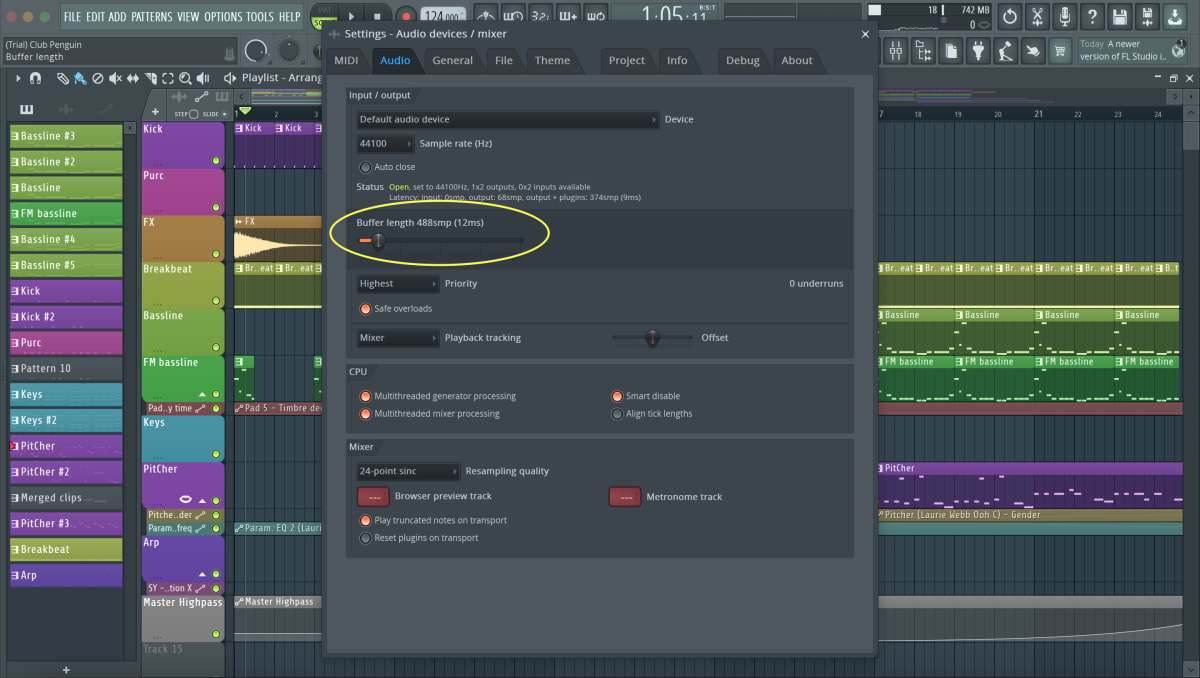
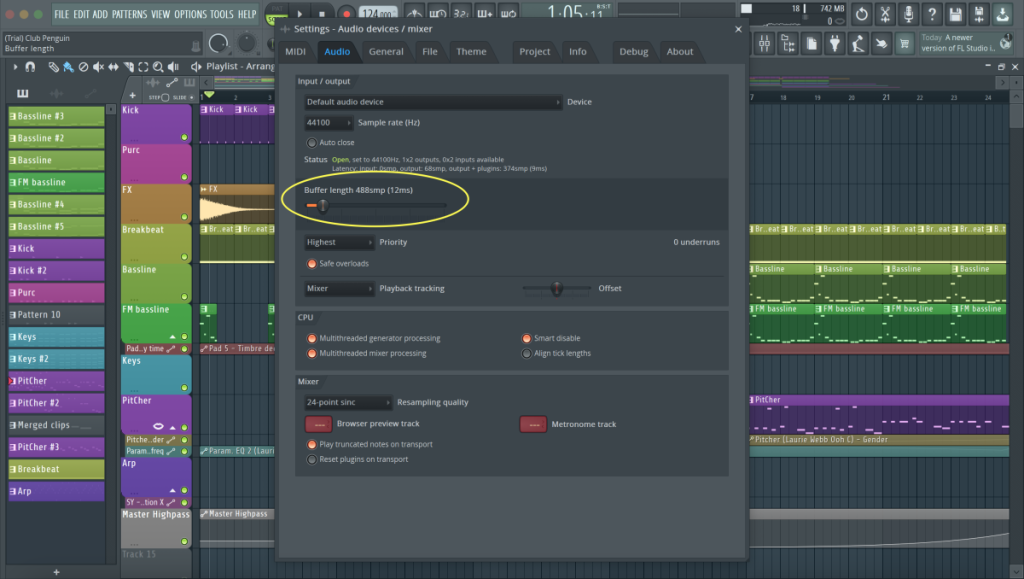
Increasing the buffer length in FL Studio can reduce the load on your RAM and CPU, improving performance. A longer buffer length reduces the number of calculations your CPU needs to perform in real-time, but it increases latency (the delay between input and sound). However, for large projects, this trade-off is often worth it.
- Step 1: Go to Options > Audio Settings.
- Step 2: Under Buffer Length, increase the size. Try doubling the default value and see if this reduces lag and CPU spikes.
5. Consolidate Patterns (Convert Patterns to Audio Clips)
Converting complex patterns to audio clips can reduce resource usage.
Steps:
- Check for high CPU-usage plugins:
- Go to View > Plugin Performance Monitor (top menu) to see which plugins are using the most RAM or CPU.
- Convert to audio:
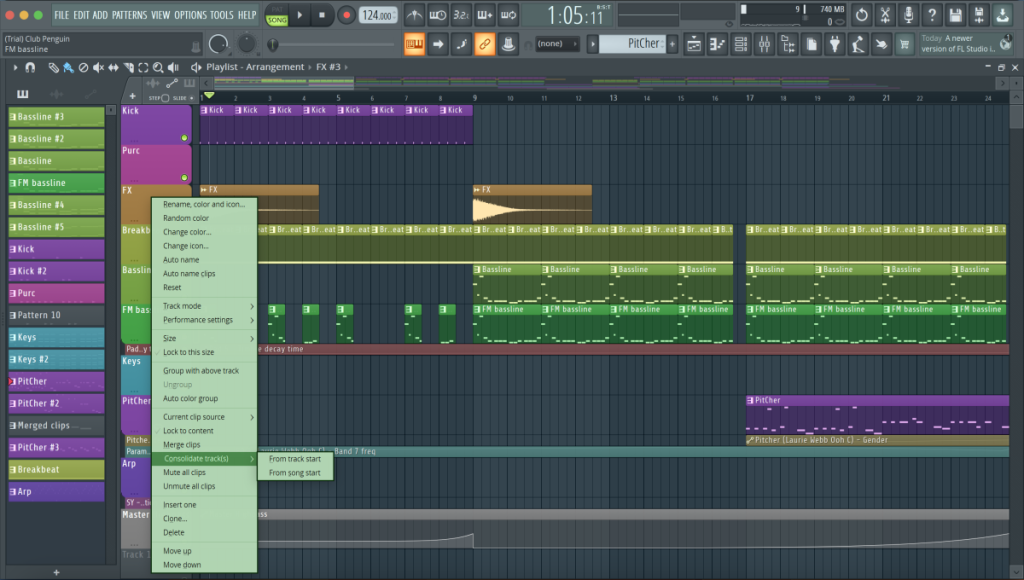
- In the Playlist, right-click the track you want to optimize (on the left where the track names are).
- Select Consolidate track > From song start (or From track start).
- This turns the track into an audio clip and disables the original resource-heavy pattern or plugins.
6. Optimize Audio Clips
For projects with many audio tracks:
Turn off “Keep on disk”:
- Click on the audio clip in the Playlist.
- In the window that opens (the Audio Clip Channel Settings), click the wrench icon.
- Find the option labeled Keep on disk and turn it off (if it’s on). This makes the audio load directly into RAM instead of streaming from the disk.
View all audio clips:
- Hold down Command and scroll your mouse wheel (or use a trackpad gesture) to zoom out in the Playlist. This will allow you to see all audio clips at once and make optimization decisions.
7. Limit Polyphony
- Reduce the maximum polyphony of channels:Select the instrument or sound channel you want to optimize.
- Click the wrench icon (Miscellaneous Channel Settings).
- Find the Max Polyphony setting and lower the number (e.g., set it to 6 or 8 for melodies, or 1 for monophonic sounds like bass).
8. Disable MIDI Options
If you’re not using MIDI, turning off MIDI settings saves system resources.
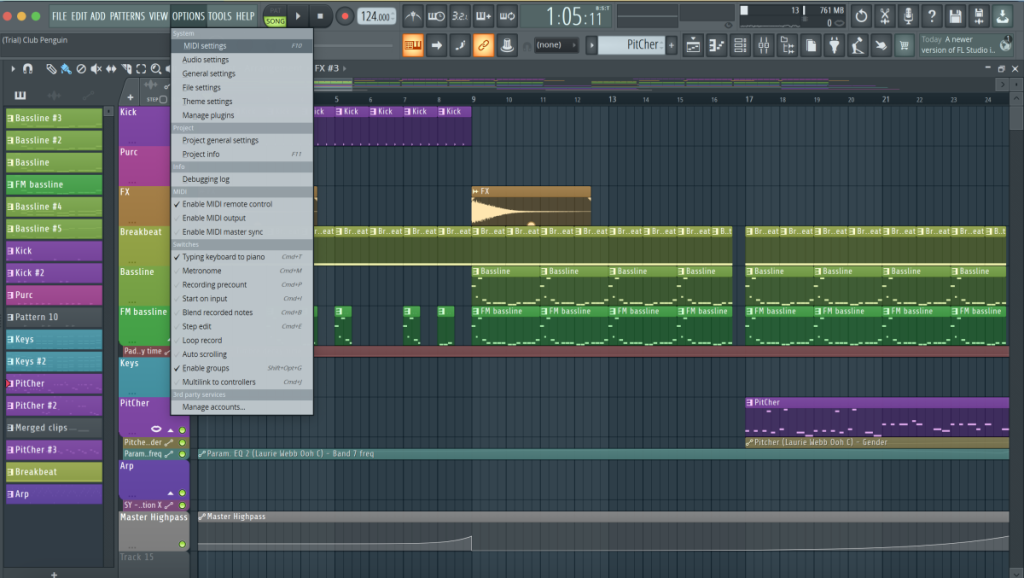
- Go to the top menu, click Options > MIDI Settings.
- Uncheck any unnecessary Enable MIDI options (like Enable MIDI output, Enable MIDI master sync, etc.).
9. Clear Plugin Cache
Clearing the plugin cache periodically can help FL Studio run more efficiently.
- Clear the cache:
- Go to Options > File Settings in the top menu.
- Click the button labeled Clear plugin cache.
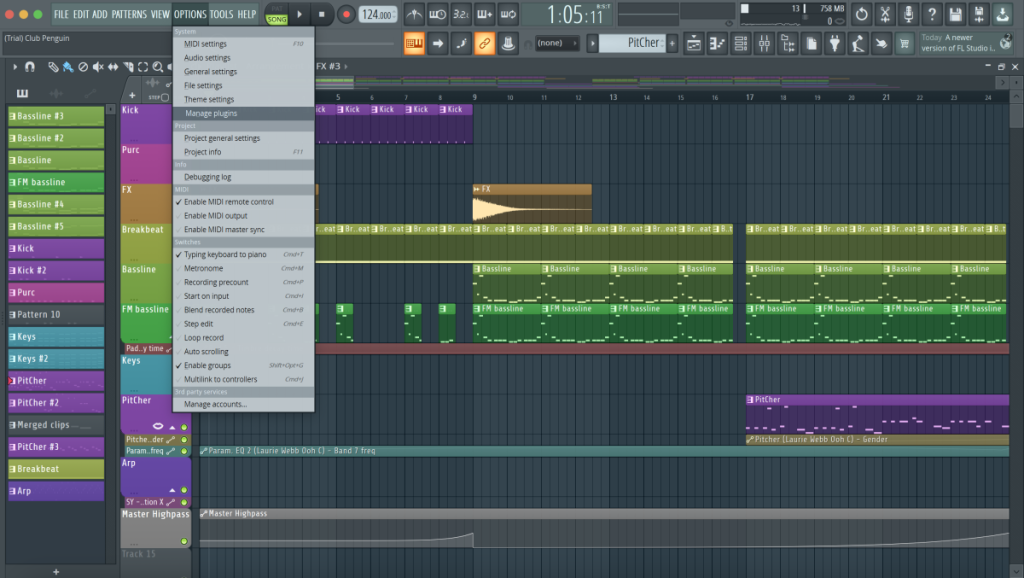
- If needed, rescan your plugins by going to Options > Manage Plugins > Start scan.
Additional Tips for Optimizing FL Studio Performance
- Update to the latest version of FL Studio
- Adjust buffer length in Audio Settings (10-40 ms recommended for most systems)
- Set sample rate to 44,100 Hz or 48,000 Hz
- Close all non-essential programs while using FL Studio
- Regularly clean your computer’s cooling vents to prevent CPU throttling
By implementing these methods, you can effectively clear RAM in FL Studio and optimize your music production workflow. Remember, a well-optimized system leads to smoother creativity and better results.
